
Start with a professional assessment
Skip the guesswork. DIY checks like feeling for drafts near windows or tracking utility spikes give you a vague sense of the problem, but they miss the hidden leaks that drive up energy bills. A professional home energy audit provides the data you need to prioritize fixes effectively.
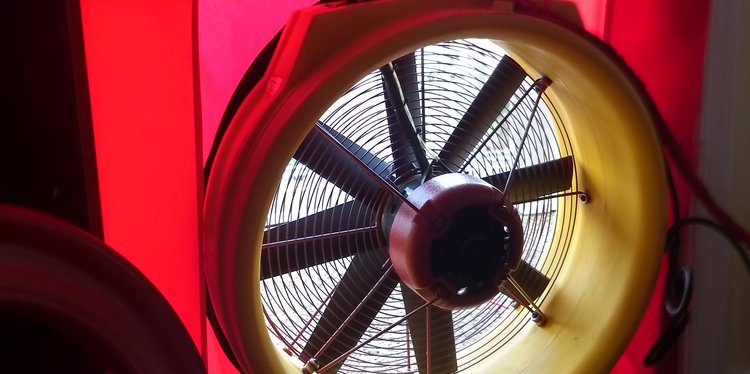
The gold standard for this assessment is the blower door test. Technicians seal a powerful fan in an exterior door frame to depressurize the house. This pressure difference pulls outside air in through every crack, gap, and hole in the building envelope. The result is a measurable leak rate and a clear map of where air is escaping.
This process reveals issues that are invisible to the naked eye, such as leaks around attic hatches, plumbing penetrations, and electrical outlets. Without this baseline data, you might seal obvious drafts while ignoring the larger, more costly air exchanges happening elsewhere in the structure.
A professional assessment also includes a combustion safety check. Pressurizing or depressurizing a home can back-draft combustion appliances like furnaces or water heaters, pulling dangerous carbon monoxide into your living space. Certified auditors test these systems to ensure your home remains safe during and after the audit.
Starting with this comprehensive evaluation ensures you target the right upgrades first, maximizing the impact of your investment in home efficiency.
Seal air leaks before adding insulation
The most common mistake homeowners make during a home energy audit is adding insulation before stopping the air movement. Insulation slows heat transfer, but it does not stop air. If you insulate over gaps, you trap warm or conditioned air inside the wall cavities or attic space, leading to moisture problems and wasted energy. The correct sequence is to seal the envelope first, then add insulation to the thermal barrier.
Attic hatches and access panels
Attic hatches are often the largest single source of air leakage in a house. The gap around the frame allows conditioned air to escape directly into the unconditioned attic. Seal this gap with weatherstripping along the sides and top of the frame. For the bottom edge, install a bulb-style gasket or apply adhesive foam tape to create an airtight seal when the hatch is closed. If the hatch is old or warped, consider replacing it with an insulated, airtight attic door unit.
Rim joists and band boards
Rim joists (also called band boards) are the wooden members where the floor framing meets the foundation. This area is typically uninsulated or poorly insulated, leaving a direct path for outside air to enter the living space. Seal the seams between the rim joist and the sill plate with caulk. Then, fill the stud cavities with spray foam insulation, which expands to fill irregular gaps around pipes and wires. This creates both an air barrier and a thermal barrier in one step.
Window and door frames
While windows and doors are primarily glazing components, the framing is where air leaks occur. Check the perimeter of all window and door frames for gaps between the frame and the drywall or siding. Use caulk to seal exterior gaps and weatherstripping to seal interior gaps. For larger gaps that caulk cannot handle, use expanding spray foam, but apply it sparingly to avoid warping the frame.
Why sequence matters
Sealing first ensures that the insulation you add works as intended. If you insulate first, air can still bypass the insulation through gaps, rendering the R-value less effective. By sealing leaks first, you create a continuous air barrier. This reduces the load on your HVAC system and ensures that the insulation performs at its rated efficiency.
Check your work
After sealing, perform a simple leak check. On a windy day, hold a thin piece of tissue or incense stick near the sealed areas. If the smoke or tissue moves, the seal is incomplete. Re-caulk or add more weatherstripping as needed. This verification step ensures that your home energy audit leads to tangible savings on your utility bills.
Upgrade attic and wall insulation
Insulation is the primary barrier between your home and the weather. Upgrading attic and wall insulation reduces the load on your HVAC system, directly lowering energy bills. Before buying materials, you need to know what is already in your walls and attic. This section walks you through evaluating current R-values and selecting the right material for 2026 standards.
Evaluate current R-values
Start by checking your attic. Pull back a small section of insulation in a few spots to see the depth. Use a ruler to measure the thickness. Compare this measurement to the recommended R-value for your climate zone. The Department of Energy provides zone-specific charts to help you determine if your current insulation is sufficient. If the attic insulation is thin or uneven, it is time to add more.
Checking wall insulation is harder because you cannot see it. Look for signs of gaps, such as drafts near outlets or inconsistent room temperatures. If you are unsure, a professional blower door test can reveal air leaks that suggest insufficient insulation. For walls, the goal is usually to achieve a higher R-value than what was standard when the house was built.
Choose the right insulation material
Once you know how much insulation you need, pick the material. Each type has different R-values per inch, costs, and installation requirements. The table below compares the three most common options for residential upgrades.
| Material | R-Value per Inch | Cost (Installed) | Installation |
|---|---|---|---|
| Blown-in Cellulose | 3.2–3.8 | $1.50–$3.50/sq ft | Moderate |
| Fiberglass Batts | 2.9–3.8 | $1.00–$2.00/sq ft | Easy |
| Spray Foam (Closed-cell) | 6.0–7.0 | $3.00–$7.00/sq ft | Professional Only |
Blown-in cellulose is dense and effective for retrofitting existing walls. It settles into cavities, filling gaps that batts might miss. Fiberglass batts are the most affordable option and work well for new construction or open attics. Spray foam offers the highest R-value and acts as an air seal, but it requires professional installation and costs significantly more.
Installation steps
Clear the attic of stored items. Seal any visible air leaks around light fixtures, plumbing stacks, and chimneys with caulk or foam before adding insulation. This ensures the insulation works efficiently.

Measure the square footage of the attic floor or wall cavities. Calculate the required depth based on the R-value per inch of your chosen material. Buy 10% more material to account for settling or waste.
For blown-in cellulose, rent a machine and blow the material evenly across the attic floor. For batts, cut them to fit between joists without compression. For spray foam, hire a licensed contractor to apply the foam in thin layers.

Verify the final depth with a ruler. Ensure no gaps remain around the perimeter. Replace any removed drywall or attic access panels. Seal the attic hatch with weatherstripping to prevent air leakage.
Common mistakes to avoid
Do not block soffit vents with insulation. This traps moisture and can lead to roof damage. Keep a 2-inch gap between the insulation and the roof deck. Also, avoid compressing batts. Compressed insulation loses its R-value. If you need higher R-values, add a second layer of batts perpendicular to the first layer.
Evaluate heating and cooling efficiency
Your HVAC system is the biggest energy hog in most homes, often accounting for nearly half of your utility bill. Before you commit to a new system, you need to know exactly what you’re working with. The goal here is to determine if your current unit is worth repairing or if it’s time to move toward a heat pump.
Start by checking the age of your equipment. If your furnace or air conditioner is older than 10–15 years, it is likely operating at a fraction of its original efficiency. Look for the manufacture date on the serial number plate, usually found on the side of the unit or inside the access panel. Older units often use R-22 refrigerant, which is banned and expensive to refill, signaling that replacement is the more economical long-term choice.
Next, check the efficiency ratings. For air conditioners, look for the SEER2 (Seasonal Energy Efficiency Ratio) number. For furnaces, look at the AFUE (Annual Fuel Utilization Efficiency) percentage. Modern heat pumps can achieve SEER2 ratings above 15, while older systems might hover around 10 or 11. A lower number means your system works harder to move the same amount of air, driving up costs.
Listen for unusual noises like grinding, squealing, or rattling. These sounds often indicate worn bearings, loose belts, or motor issues that will only get worse. If your system struggles to maintain temperature or requires frequent repairs, it is a strong sign that efficiency has dropped below a viable threshold.
Finally, consider the refrigerant type. If your system uses R-22, replacement is almost certainly the right move due to the high cost and scarcity of the refrigerant. Newer systems use R-410A or the upcoming R-32, which are more environmentally friendly and efficient. If your system is old, inefficient, and uses outdated refrigerant, a heat pump upgrade is likely your best path forward.
Claim 2026 tax credits and rebates
You can recover a significant portion of your energy audit costs through federal tax credits and local utility rebates. The primary federal incentive is the 25C tax credit, which covers a percentage of the cost for qualifying improvements like insulation, air sealing, and heat pumps.
The 25C credit allows you to claim 30% of the cost of qualified energy-efficient improvements, up to a maximum of $3,200 per tax year. This includes items such as advanced air infiltration barriers, home energy audits, and specific heat pump water heaters. You must file IRS Form 5695 with your tax return to claim this credit.
Beyond federal credits, many utility companies offer direct rebates for installing high-efficiency equipment. These rebates often stack with the federal tax credit, effectively doubling your savings. For example, a heat pump installation might qualify for a $500 utility rebate plus the 30% federal credit on the remaining balance.
Check your local utility provider’s website for a list of eligible measures. Some programs require pre-approval before installation, while others reimburse you after the work is completed. Keeping detailed receipts and manufacturer specifications is essential for both the tax credit and rebate claims.
Verify improvements with a follow-up test
A post-retrofit blower door test is the only way to confirm that your energy upgrades actually worked. Without this verification, you are guessing whether the money spent on insulation, air sealing, or window replacements delivered the promised efficiency gains. This final audit closes the loop on your home energy audit journey, turning speculative savings into measurable data.
Schedule the re-test
Contact the same contractor or energy auditor who performed your initial assessment. Consistency in equipment and methodology ensures that the results are directly comparable to your baseline. Request a second blower door test to measure the new air leakage rate, typically expressed in air changes per hour (ACH50).
Review thermal imaging results
While the blower door quantifies leakage, thermal imaging reveals where heat is escaping. Ask your auditor to perform a follow-up thermal scan. This visual check highlights missed spots in insulation or poorly sealed penetrations that the blower door might not fully capture on its own. It is the difference between knowing that you have a leak and knowing where it is.
Compare utility bill baselines
Data from the tests must be contextualized by actual energy consumption. Gather your utility bills from the same period last year to establish a true baseline. Compare these against your current usage. If your home energy audit identified significant inefficiencies, you should see a corresponding drop in kilowatt-hours or therms used, adjusted for local weather patterns.
Checklist for verification
-
Schedule second blower door test with original auditor
-
Review updated ACH50 air leakage numbers
-
Analyze thermal imaging for missed insulation gaps
-
Compare current utility bills to previous year's data
-
Document final efficiency report for tax credit records
Common home energy audit mistakes
Skipping the audit is the easiest way to waste money on upgrades that don't work. Even when you hire a pro or run a DIY check, several pitfalls can derail your results. Fixing these errors now saves you from double-paying for the same problem later.
Sealing before insulating
Air leakage must go first. Insulation slows heat transfer, but it does nothing if air is moving through the wall cavities. Seal gaps around windows, doors, and penetrations with caulk or weatherstripping before adding any batts or spray foam. This step ensures the insulation actually stays where you put it and performs as rated.
Ignoring the attic
The attic is your home's thermal boundary. Heat rises, so a poorly insulated attic lets conditioned air escape in winter and hot air bleed in during summer. Check insulation depth with a ruler and look for signs of moisture or mold. If the insulation is compressed or wet, it has lost most of its R-value and needs replacement.
Choosing the wrong HVAC size
Oversized systems short-cycle, wasting energy and failing to dehumidify. Undersized units run constantly, driving up bills. Right-sizing requires a Manual J load calculation, not just a rule of thumb based on square footage. An accurate audit includes this calculation to ensure your heating and cooling equipment matches your home's actual needs.

No comments yet. Be the first to share your thoughts!